For comprehensive guidance on deploying Scout, including both written instructions and video tutorials, please consult the following knowledge base articles:
FAQ & TROUBLESHOOTING
This section of the guide will be regularly updated to include new frequently asked questions, along with additional troubleshooting tips and advice as they emerge.
Q1: What is the latest version of Veeam Agent for Windows and Veeam Backup and Replication that Probax supports?
|
Product |
Version |
|
Veeam Agent for Windows |
6.3.3.38 |
|
Veeam Backup and Replication |
12.3.2.4465 |
Q2: What are system requirements for Probax Scout and Veeam Agent for Windows?
Hardware Requirements:
- CPU: x86-64 processor.
- Memory: 2 GB RAM or more. Note that memory consumption varies depending on the number and size of processed disks.
- Disk Space: 400 MB for product installation.
- Network: 1 Mbps or faster, with support for high latency and reasonably unstable WAN links.
System Firmware:
- The system firmware must be either BIOS or UEFI compatible.
Operating System Requirements:
Only 64-bit versions of the following operating systems are supported:
|
Operating System |
Version(s) |
|
Microsoft Windows Server |
2022, 2019, 2016, General Availability Channel (1803-20H2) |
|
Microsoft Windows Server |
2012 R2, 2012, 2008 R2 SP1 |
|
Microsoft Windows |
11 (21H2-23H2), 10 (1909-22H2), Long-Term Servicing Channel (2015, 2016, 2019) |
|
Microsoft Windows |
8.1, 7 SP1 |
- If you're using a Server Core installation of Microsoft Windows Server, please note that Veeam Agent for Microsoft Windows (VAW) is only supported when managed by Veeam Backup & Replication (VBR).
File System Requirements:
- Microsoft Windows FAT32/exFAT, NTFS, ReFS
Note that the supported file system must reside on a volume that is 64 TB or smaller.
Q3: Why am I asked for an IP address when deploying a new Scout?
- We require the Local IP address when a common hostname (such as Server01) is detected.
Q4: Can I modify the Veeam Agent for Windows Job name created by Probax Scout?
-
The Veeam Agent for Windows job created by Probax Scout adheres to a specific naming convention required by Scout. For this reason, we strongly advise against changing the Veeam Agent for Windows job name generated by Probax Scout.
Q5: Why does Scout fail to successfully link with MSP Backup?


Upon clicking 'Update Hostname,' the platform will initiate an attempt to connect with the Scout software installed on your device. This process is typically swift, taking only a few seconds. Should the connection attempt fail, please consider the following troubleshooting steps:
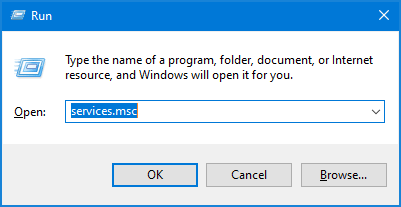
- Press the Windows + R keys on your keyboard to open the Run window.
- Type services.msc and hit Enter on your keyboard or click/tap the OK button.
- Within the Services window, navigate through the list until you locate "Probax Scout" and "Probax Scout Watchdog". Verify that the status of these services is set to Running.

- Should the status of either or both services be Stopped, attempt to restart the halted service(s) by right-clicking on the service name and selecting Start.
- Should the service(s) fail to start, or if they start only to stop shortly after, consider rebooting your computer. This issue may stem from recent installations of other software or Windows updates that necessitate a system reboot.
- If you continue to have issues with Scout, uninstall Scout by selecting Probax Scout Uninstaller from the Start Menu:

- Once Scout is uninstalled, delete the following folder:
- C:\Program Files (x86)\Probax Scout
- Then, delete the contents of the following Temp folders:
- %localappdata%\Temp
-
C:\Windows\Temp\
- Next, reinstall Probax Scout and link it with MSP Backup.
- Once Scout is uninstalled, delete the following folder:
- Should the above steps not rectify the problem, we encourage you to reach out to our support team for assistance at care@probax.io.
Q6. How do I remove a Resource from MSP Backup?
- Prior to removing a Resource from the portal, Scout will need to be uninstalled from the system or the resource will repopulate in the portal.
- To uninstall Scout, select the Probax Scout Uninstaller from the Start Menu:
- Alternatively, you can navigate to C:\Program Files (x86)\Probax Scout, and run uninstall.exe located in this folder.
- Once Scout is removed, locate the Resource in the portal and select the kebab menu next to the Resource.
- Next, select Remove Resource from Hive to remove the reousrce.

Q6. How can I unlink Scout from the portal and remove all data associated with the Protected Resource?
- Prior to unlinking a Resource from the portal, ensure Scout has been uninstalled from the system.
- To uninstall Scout, select the Probax Scout Uninstaller from the Start Menu:
- Alternatively, you can navigate to C:\Program Files (x86)\Probax Scout, and run uninstall.exe located in this folder.
- Once Scout is removed, locate the Resource in the portal and select the Probax Icon next to the Resource:

- In the View Scout window, select Unlink Scout:

- By selecting Unlink in the Unlink Scout window, you are confirming a destructive action that will remove all data associated with that particular Resource:

Q7. Is it necessary to whitelist Scout for optimal functionality?
Absolutely. For Scout to operate seamlessly, it's imperative that you whitelist Scout along with all its associated properties in your antivirus and firewall configurations. Following the installation of Scout, if there's a noticeable delay in its check-in times, it could indicate a need for whitelisting. To ensure uninterrupted service, we recommend whitelisting the following:
- Folders:
C:\Program Files (x86)\Probax Scout\- Files:
C:\Program Files (x86)\Probax Scout\Probax-Scout-Watchdog.exe
C:\Program Files (x86)\Probax Scout\Probax-Scout-Controller.exe
C:\Program Files (x86)\Probax Scout\Probax-Scout.exe- Services:
Probax Scout Watchdog
Probax Scout- Processes:
probax-scout-watchdog.exe
probax-scout.exe
probax-scout-controller.exe- Domains:
scoutapi.probax.io- Ports:
TCP 443