For managing the way your customer's usage appears on Hive, Head to our Knowledge Base article How to Set Storage Quotas in Hive
Topics covered:
- Setting up ConnectWise API integrated user with Public key, private key and URL (recommended)
- Setting up ConnectWise API user with least-privilege access and restricted access
- Adding your organisation to Hive
- Connecting accounts and billables
Generating a ConnectWise public key, private key and URL
To link your organization in Hive, you will need to generate API keys (both public and private keys) as well as locate your URL in the ConnectWise console.
To create API keys in ConnectWise:
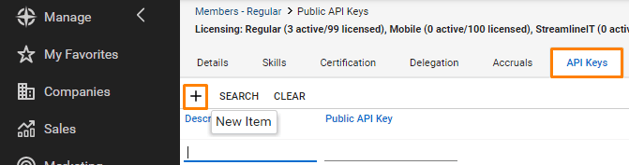
- In ConnectWise, select the 'System' tab, and hit 'Members'. Either select an existing member by clicking it's name in the list, or hit 'New Member' to create one to use for this link. NOTE: You can begin this process with an API Member (or a New API Member), by simply heading to the 'API Members' tab instead of the 'Regular' tab
This member will need full rights to all the relevant customer information stored in ConnectWise

- On the Member Maintenance screen, click the API Keys tab and then click the New Item button.
- In the Description field, type the description for the newly created keys (for example, Hive Integration).
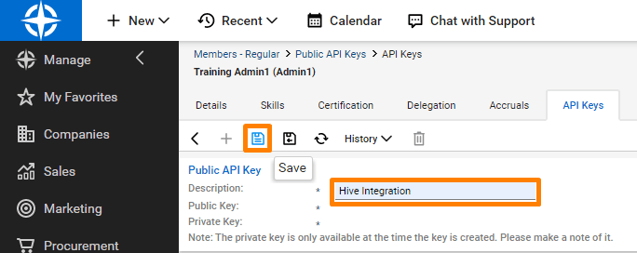
- Click the Save button to save the new item.
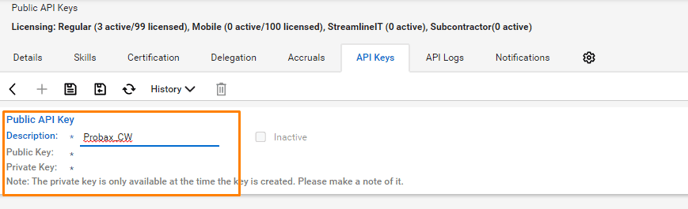
NOTE: Take care to write down the private key here, as it will expire shortly after hitting 'save'. You will have to specify these keys when you configure integration with ConnectWise.
Find the URL to enter:
- Head to the 'Systems' tab as in step 1, and select 'My Company'.
- Find under "Miscellaneous Options" the "Site URL for Manage*". This is your URL to use in Hive

Generating a least-privilege access user for CW integration
Assigning a user in this fashion will prompt admin users to allow access for the api to function correctly. An admin user will have accept this to ensure 100% functionality in Hive.
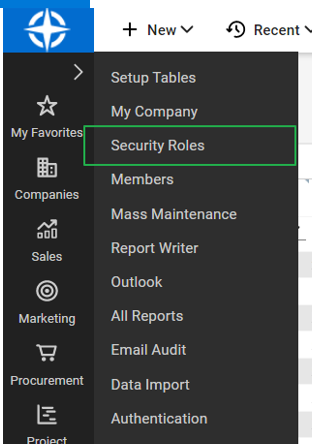
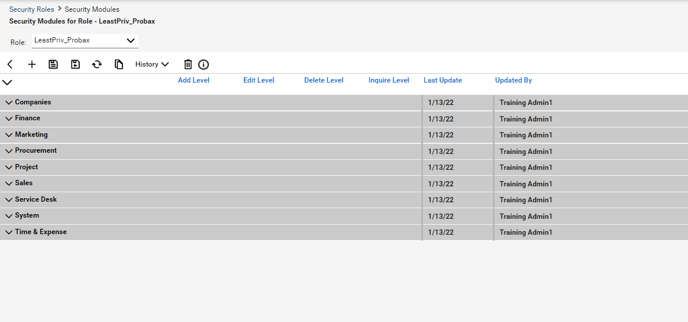
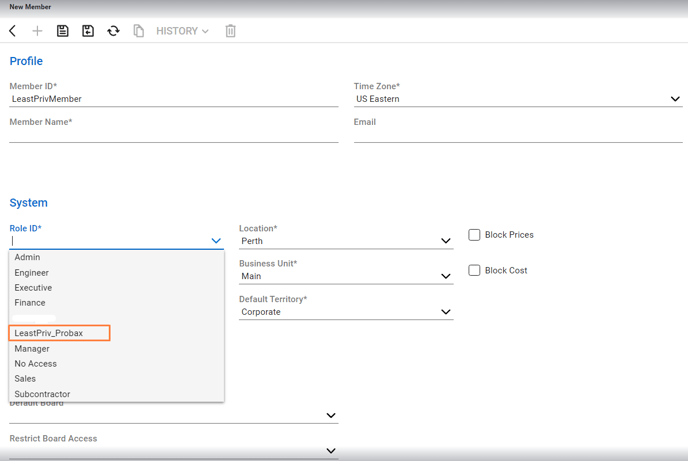
- Create a new security role by heading to the 'System' tab at the bottom left of your console, and selecting 'Security Roles'
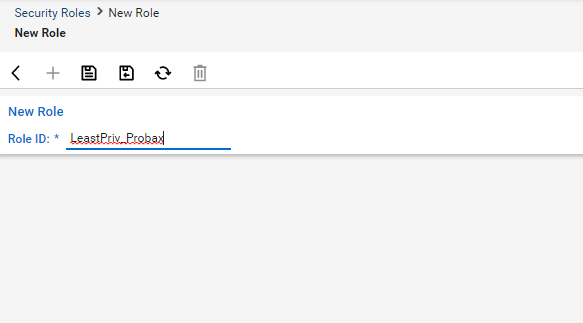
- Hit 'Create New Role' and give the role an ID (we suggest 'LeastPriv_Probax' or similar)
- Once that role has been saved, you will be taken to the permission levels pane, where you will need to set two permissions
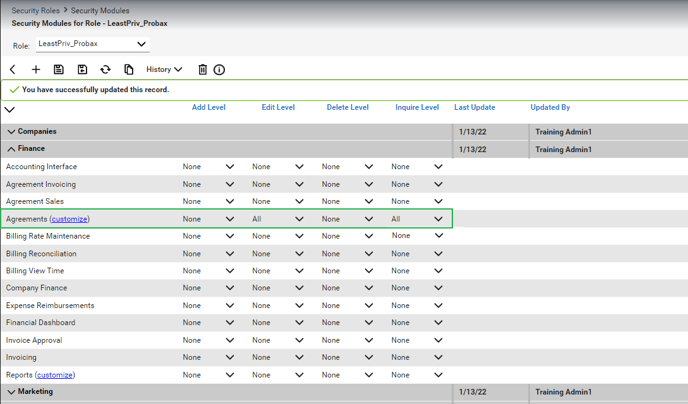
- Expand the 'Finance' menu, and navigate to the 'Agreements' record and set the 'Edit Level' and 'Inquire Level' to "All"
Expand the 'Company' menu, and navigate to the 'Company Maintenance' record and set the 'Add Level' and 'Inquire Level' to "All"
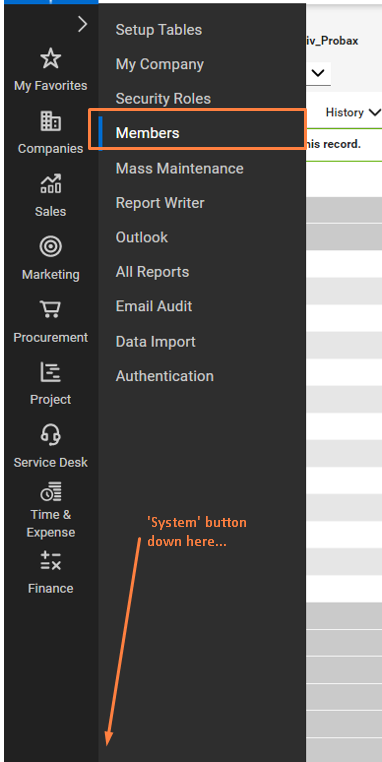
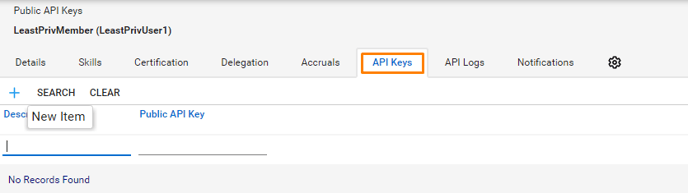
- To create a least privilege member, navigate to the 'System' tab at the bottom-left of your console, selecting the 'Members' tab and hitting 'New item' under 'API members'
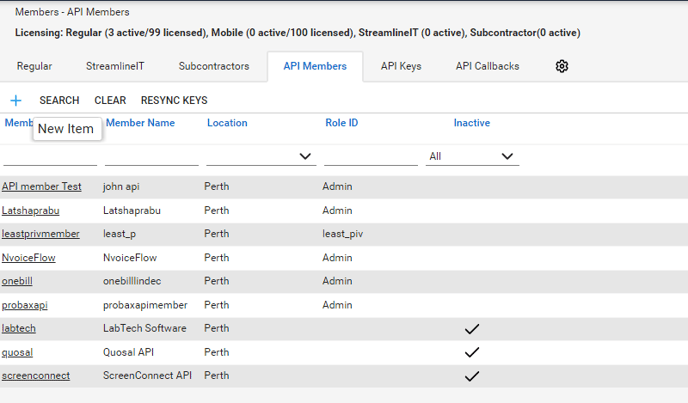
- Fill in the 'Member ID' and 'Member Name' and set the 'Role ID' to the new least privilege role we created earlier
- In this same section (the 'Members' section), navigate to the 'API Keys' tab, and create a new API key. These values we'll need to be recorded
- You will also need to take note of the correct URL:
- Head to the 'System' tab, and select 'My Company'.
- Find under "Miscellaneous Options" the "Site URL for Manage*". This is your URL to use in Hive
Getting started in Hive
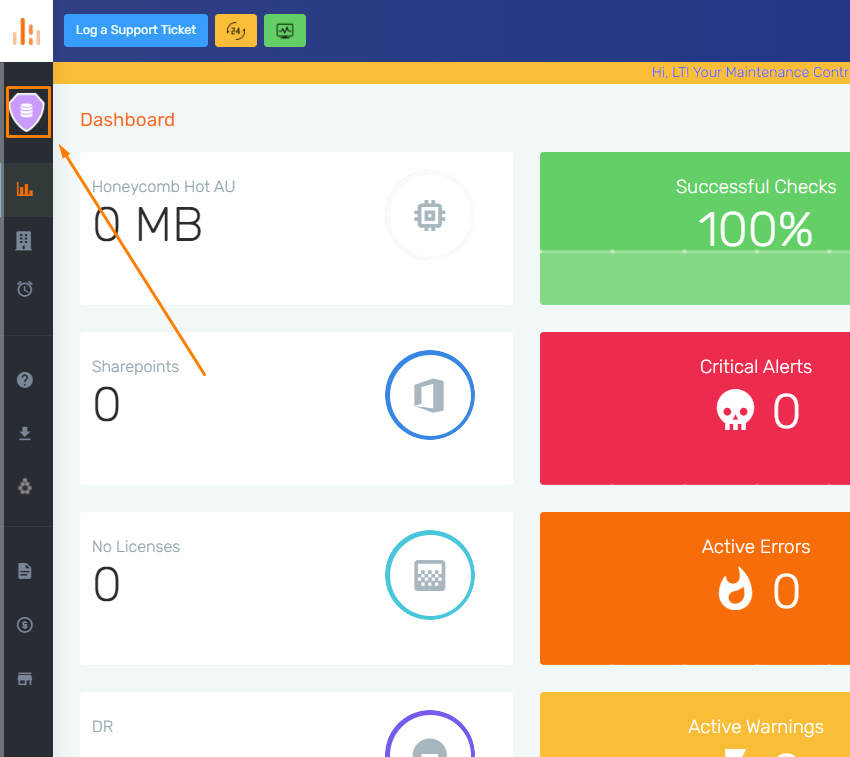
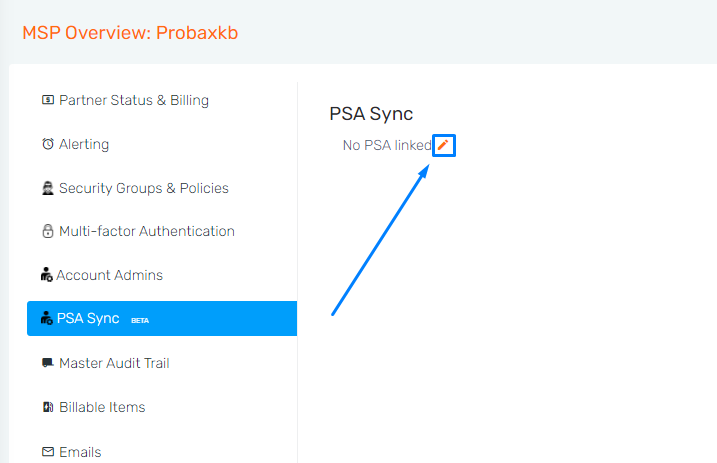
- Head to the MSP Overview section of Hive by selecting the 'shield' icon at the top-left of your Hive window:
- Click on 'PSA Sync' on the left hand side.

- Select the small pencil icon, and enter in your details in the window on screen
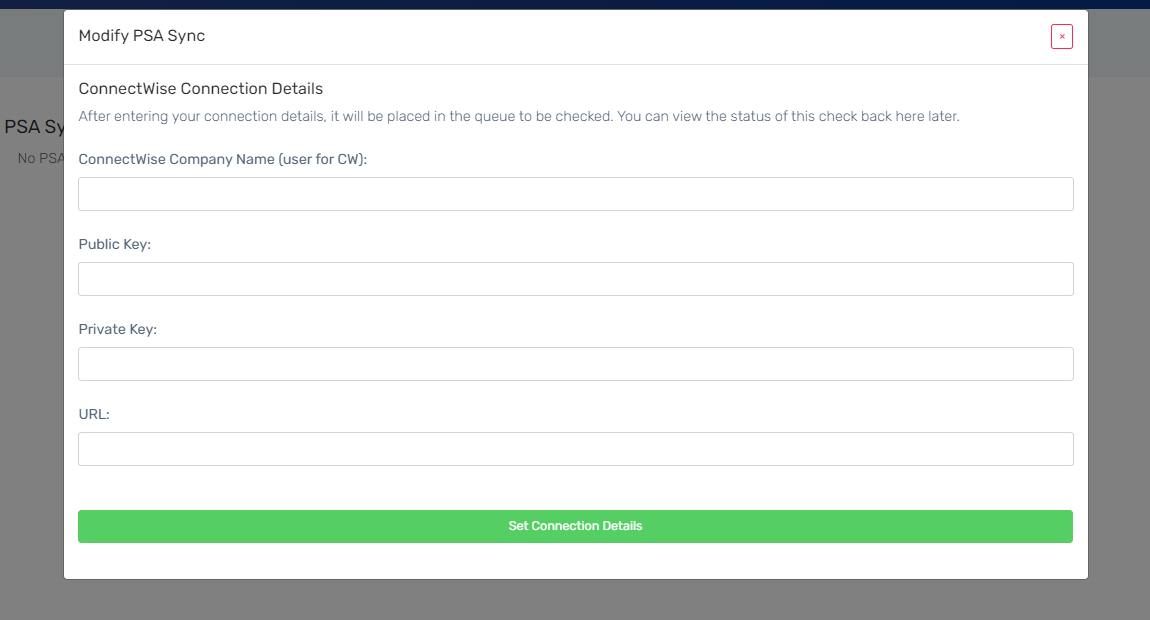
For the above form, be sure to use the name that you log into Connectwise Manage with. This can be found in the login screen, under the heading 'Company'. For Public Key, Private Key and URL, please refer to the above steps in this article.
Linking your accounts
Once you have your account set up, select the 'Show Accounts' tab to view the ConnectWise Customers you currently have. Hive will attempt to match these for you, but some customers may need to be manually paired due to character differences in both databases:
- For each customer you currently have active in both ConnectWise and Hive, match the corresponding Hive Account name on the right hand column to the ConnectWise account name on the left-hand side;
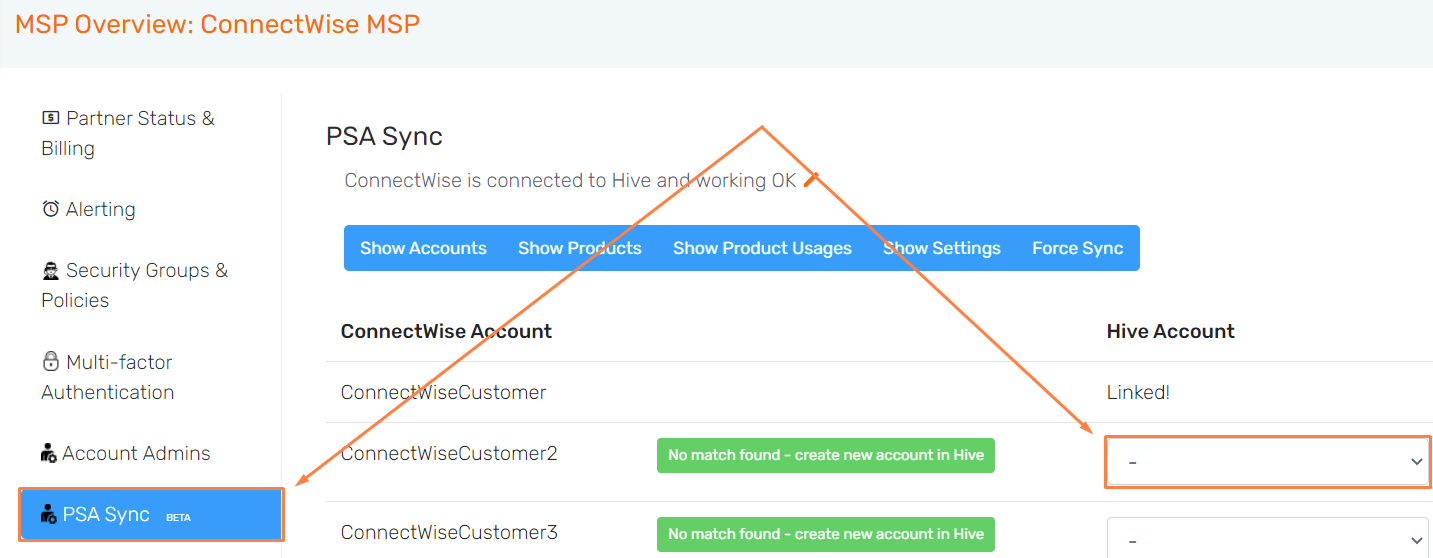
- Click the drop-down box to find the corresponding customer account. This will link those customers together
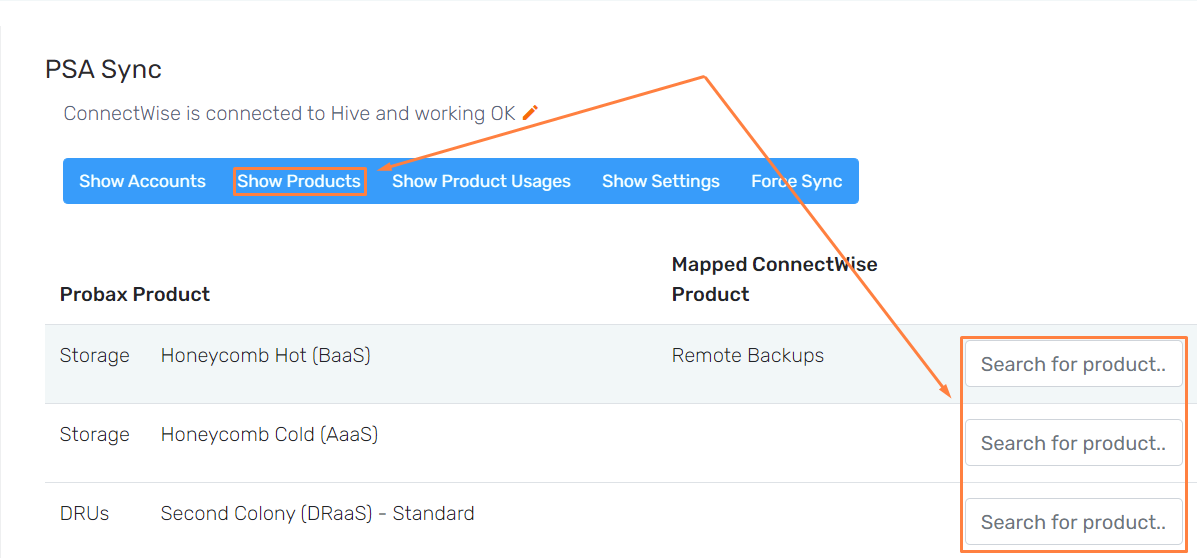
Linking your products
Probax's billable items may be slightly different to those used by an MSP to charge their customers using ConnectWise. To account for this, the 'Show Products' tab allows you to mapped the ConnectWise billable to an equivalent Probax product listing.
- Hit the 'Show Products' Tab at the Top of your PSA Sync menu
- View the list of items on the left-hand side, selecting the products you wish to link.
- Enter in the product in the 'Search for product...' box to index your ConnectWise product name:
Feel free to review your product usages at any time, using the "Show Product Usages" button, which will update automatically over time.
View your product map
Under the "Product Usages" tab, you can see a table displaying which accounts/products have been properly linked.

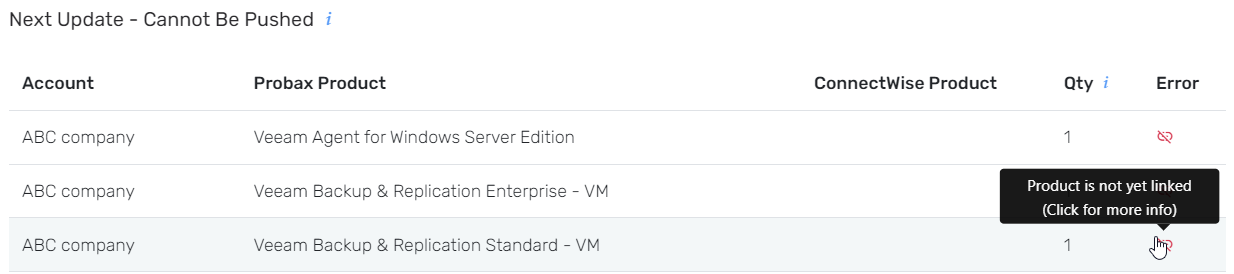
Products marked with a green checkmark indicate that the value shown will be pushed out to ConnectWise on the next update. Products marked with a red exclamation mark indicate that an issue was found and one can click for more info.

Syncing and Updating
Syncing is the process of pulling your ConnectWise data (product and company info) into Hive. Once companies and products are pulled into Hive, you can link your Hive End User accounts to your ConnectWise companies and your Hive products to your ConnectWise items.
Syncing runs automatically on a schedule every 3 days but it can be manually actioned at any time as well.
Updating is the process of pushing the values in Hive out to ConnectWise. Here's how this process works:
- For every account that is linked to a ConnectWise company, we find all linked products.
- For each linked product, we see if an addition exists in ConnectWise for this item on the relevant company.
- If we find an addition in ConnectWise for this company/item combination, we push the quantity in Hive for this company/item out to ConnectWise.
Although updates are ran on a schedule of every five days, they can also be manually actioned at any time or disabled altogether.
View Sync/Update progress and report
Hovering over the green arrow icon reveals the current status of any syncs or updates that may be in progress.
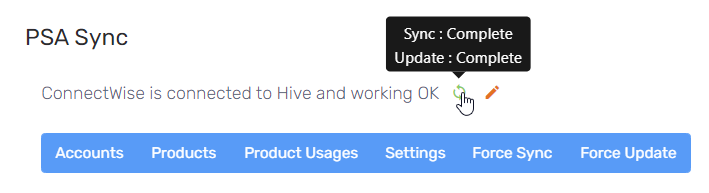
Clicking the icon pulls up the Sync/Update report:
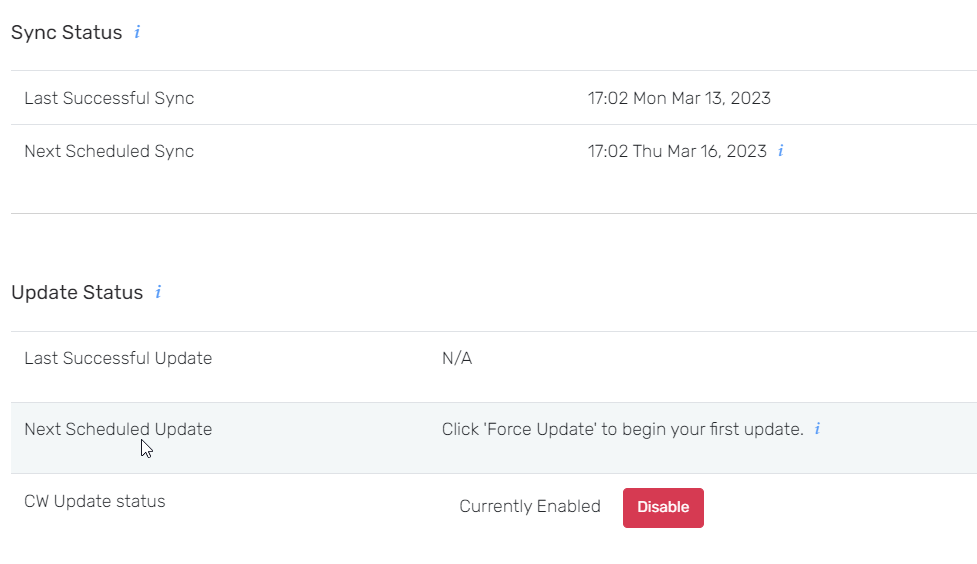
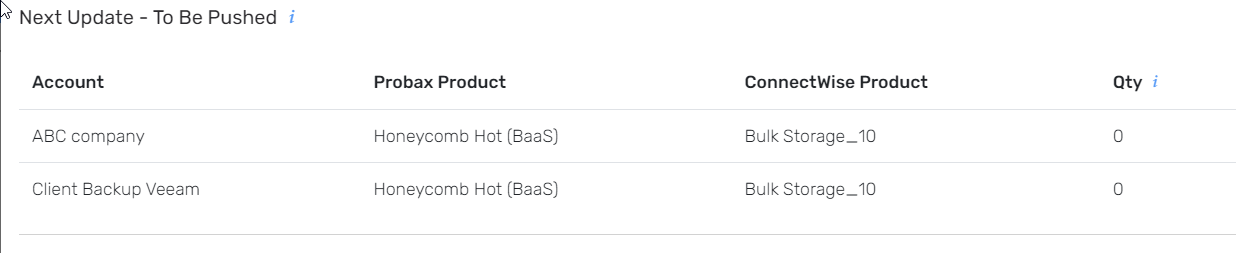
This also shows what quantities will be pushed out from Hive to ConnectWise on the next Update.
Finally, we list which items will not have their quantities pushed out to ConnectWise, and describe which (if any) issues we might detect:
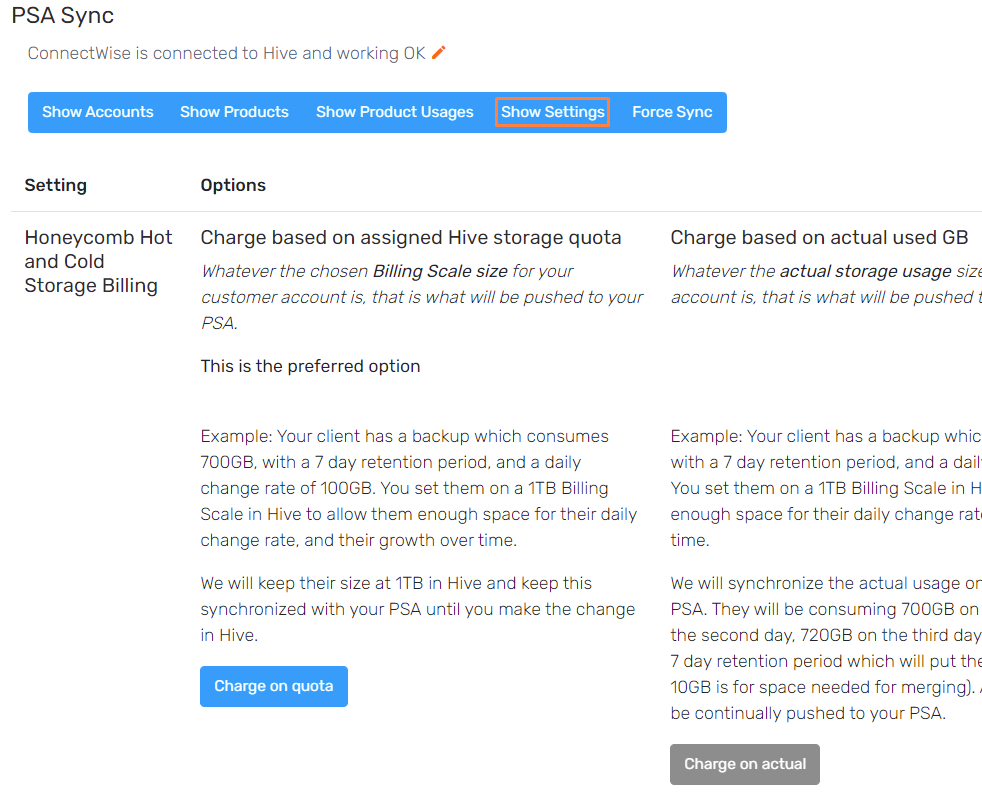
Review your settings
In the 'Show Settings' tab, you can review the way Hive will push charges through to your Customer Agreements in Conectwise. This will allow you to bill customers based their ACTUAL usage, or the upper bracket of allowed storage quota.
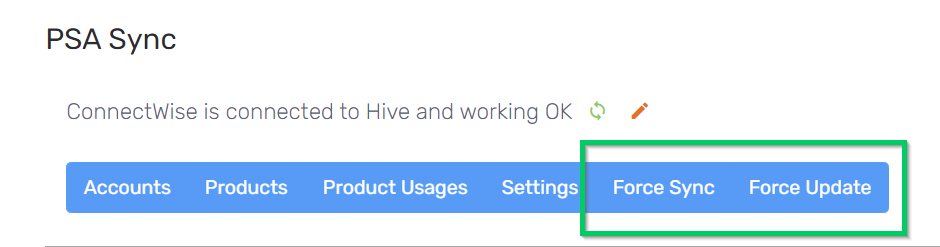
Forcing a sync
Given the nature of the day-to-day running of an MSP, the properties of an MSP ConnectWise account can change all the time with:
- Existing customers requirements changing
- On-boarding for new customers
- Changes to billing, charges or other services offered
The 'Forcing a Sync' button allows you to push through a sync of all the Connectwise properties into Hive, allowing live updating within Hive of ConnectWise information. This is especially useful when working on updating billing information on either platform, to ensure Hive is up-to-date on the latest configuration of a customer.